
Content Editor
The content editor allows you to edit the message content of your mail job.
The editor consists of the main panel that displays the actual editor and an additional options panel on the right. The options panel also contains the [OK] and [Cancel] buttons for the editor in the bottom right corner. Click [OK] to submit the changes in the editor or [Cancel] to leave the editor without submitting any changes.
In the options panel, above the buttons, you have several sections. Each section can be opened and closed separately, so that you only need to see the content of those sections that are currently of interest to you. Simply click on a section header to open/close this section.
The content editor for a HTML message is a What-You-See-Is-What-You-Get (WYSIWYG) editor that has two modes: In Design Mode you edit the HTML message in WYSIWYG fashion. In Code Mode you can edit the underlying HTML code directly. You can switch between the two modes at any time with the icons at the top left of the editor toolbar.
Use the other icons in the editor toolbar for access to various other editor function, for example to define formats and colors, to create links, add images, etc.
Note that the HTML editor in LISTSERV Maestro supports only a subset of all possible HTML tags and styles, which includes the most commonly used HTML features, especially for emails. If you require full support of all HTML features, you must switch the editor into code mode and then enable the code protection feature, i.e. you have to forgo the WYSIWYG design mode. See below for details about the HTML support in LISTSERV Maestro's editor.
For a standard HTML message that is not based on a template, the options panel on the right contains the following sections:
Widget Hierarchy
This option panel section shows you all the fluid design widgets that are currently contained in the HTML content, and also the hierarchy in which the widgets are nested into each other.
Each widget is represented with a main entry (shown with a bold text) that can be selected with a click. If you select a main entry in the widget hierarchy, then the corresponding widget will be highlighted with a widget border in the main WYSIWYG editor panel. Double click the main entry of a widget to open the widget's properties dialog or, for an already selected main entry, click the properties icon near the right edge of the entry to open the properties dialog.
You can delete a widget by selecting its main widget entry in the hierarchy panel and pressing the DELETE or BACKSPACE key on the keyboard.
Nested below the widget's main entry, each widget also has one or two sub-entries that represent the editable content part (or parts) of the widget (shown with normal, non-bold text). These sub-entries cannot be selected directly in the widget hierarchy, but if you place the cursor inside of a widget content in the main WYSIWYG editor panel, then this content part is highlighted with a dotted border in the editor panel and the corresponding content entry in the widget hierarchy panel is also highlighted, as a feedback about which widget content you are currently editing.
See below for more details about fluid design widgets and their properties.
Fluid Design Widgets
This option panel section shows the available fluid design widgets that you can use in the HTML content.
Fluid design (often also called "responsive design") is a design principle under which the HTML content is created in such a fashion that it looks nice and readable on a variety of email clients, both with large and small screens, on computers or handheld devices.
To add a fluid design widget to your HTML content, simply place the cursor at the target location, then click on the desired widget in the fluid design widgets option panel section. Or simply drag & drop a widget from the options panel section into the HTML content.
You have the choice between several different widget types. These widgets can also be nested into each other. See below for more details about the available widget types and how to use the fluid design widgets.
All widgets that you add to the HTML content will also be represented in the "widget hierarchy" section of the option panel (see above for details).
Merge Fields
This option panel section shows all available merge fields. Click on a merge field name to insert it into the editor at the current cursor position.
User-Defined Drop-Ins
This options panel section is available if drop-in content is currently enabled. It lists all user-defined drop-ins that you have currently defined. Click on a drop-in name to insert it into the editor at the current cursor position. See also here.
System Drop-Ins
This options panel section is available if drop-in content is currently enabled. It lists all available system drop-ins. Click on a drop-in name to insert it into the editor at the current cursor position. Hover the mouse pointer over a drop-in name to see a short description of what this drop-in will do. See also here.
Images in a HTML Message
When using the content editor to add images or videos to the HTML content, you have the following options:
-
Inline Image: The image data is embedded in the message (as a special attachment). To display the image, the recipient's email client will load the image data from the message itself. No access to an external web server is necessary
For this image type, you upload the image from your local computer into LISTSERV Maestro, which will include the image with the message.
-
Linked Image: The image is located on a web server and the message contains only a reference (link) to the image. To display the image, the recipient's email client will load the image from the web server.
For this image type, you have two options:
-
If the image is already located on an external web server and you know the URL of the image, then you can simply specify the image URL to include the image as a linked image.
If you use this type, then make sure that the image file is not removed from the web server (at least not until the message is so old that either no one would open it anymore anyway, or, if somebody does, that it does not matter if the image is missing in the message). -
If the image is not located on a web server, but you have the image file on your local computer, then to include the image as a linked image, you can upload the image to LISTSERV Maestro and let LISTSERV Maestro act as the web server that serves the image.
LISTSERV Maestro will be able to serve an image of this type as long as the mail job that contains this image still exists in LISTSERV Maestro. So if you use this type, make sure that the mail job is not deleted (at least not until the message is so old that either no one would open it anymore anyway, or, if somebody does, that it does not matter if the image is missing in the message).
-
-
YouTube Video: When adding a video instead of an image, you choose if the thumbnail image that is added to the HTML as stand-in replacement is sent inline with the message or served by LISTSERV Maestro. The image data is fetched automatically from YouTube, you don't need to upload a file.
All these various methods of adding an image to a message are available via the image dialog of the content editor. See here for a more in-depth explanation of the differences between linked and inline images, which also explains the main advantages and disadvantages of each type.
Unsure what image option is best? See here for help with choosing the right option.
Fluid Design Widget Types
Fluid design (often also called "responsive design") is a design principle under which the HTML content is created in such a fashion that it looks nice and readable on a variety of email clients, both with large and small screens, on computers and handheld devices.
To achieve this, fluid design uses special HTML features to create content and images in such a way that they automatically adjust their size, and sometimes even their layout, to "fluidly" correspond to the available display size. This often requires advanced HTML knowledge and also many trial and error tests with many different email clients and devices.
LISTSERV Maestro's fluid design widgets make fluid design much easier for you. You don't need to learn the latest HTML coding tricks and email client quirks because all of this knowledge is already built into the widgets themselves. You only need to select the right widget for the desired effect, and the advanced HTML code that is generated by the widget will automatically take care of the rest.
LISTSERV Maestro offers four main types of fluid design widgets that each have several variants. These widgets can be combined and nested to achieve various different fluid layout effects. For example you can start off with a 700 pixel width content box widget, to define your main message box, then nest a two-column layout widget inside of this main content box to generate a responsive two-column layout, then nest image/video box widgets into these two columns for illustrative images.
The following fluid design widgets are available:
- Content Box Widget
- Image/Video Box Widget
- Combined Image/Video & Content Box Widget
- Two Column Layout Widget
See the fluid design widgets in action in the Fluid Design Widget Sample Video.
Content Box Widget
This widget is a general purpose content box widget that can contain any kind of nested content (including for example images, tables or other fluid design widgets).
The fluid layout behavior of a content box widget is defined by two parameters that are configured on the "Fluid
Design" tab of the widget's properties dialog. These two parameters define the width of the content box, by setting
a combined pixel and percent width: The content box will either have the configured pixel width or the configured
percent width (relative to the width of the containing parent), whichever is smaller.
For example, a box with
"300px or 50%" will resize itself so that, if possible, it is 300 pixels wide (and never larger), but it also never
takes up more than 50% of the parent width. Therefore, if necessary, it automatically shrinks to a size smaller than
300 pixels, if the parent itself is less than 600 pixels wide.
Summary: The content box widget will automatically shrink if the parent width requires it and grow if the width allows it, but will never grow to more than the allowed pixel width.
The widget properties dialog allows you to define text and background colors, paddings and border styles for the widget.
There are two main variants of the content box widget:
-
Without Surrounding Widget Box: The content box itself is not surrounded by an additional widget box. The widget therefore only takes up as much space as the width definition of the content box requires (as explained above). If this leaves unused space to the left or right of the widget, then the other content that is outside of the widget can flow "around" the widget's content box to take up this space.
The widget can be defined to be either left or right aligned (in its parent), so the surrounding content then flows around the content box on the other side.


-
With Surrounding Widget Box: The content box is nested into a surrounding widget box, which always takes up the full width of the parent element. However, the content box of the widget still takes up only as much space as the width definition of the content box requires (as explained above). If this leaves unused space to the left and/or right of the widget, then this unused space is inside of the surrounding widget box and therefore remains unused, as it cannot be used by the other content that is outside of the widget. Or in other words, the surrounding content cannot flow "around" the widget's content box.
The widget can be defined to be either left aligned, centered or right aligned in the surrounding widget box, so the unused space (if any) appears either on the right or the left or both.


A content box widget can always be switched between these variants via the "Layout" tab in its properties dialog.
Deviating behavior in Outlook: Because of the limited HTML support in Outlook, the behavior of the content box widget is different if viewed in Outlook. In Outlook, the content box width is fixed. It is always displayed with the specified pixel width. This width is not dynamically adjusted, no matter the Outlook window size.
Image/Video Box Widget
This widget is used to add an image or YouTube video to the HTML content that fluidly resizes itself according to the surrounding content and available space.
If the widget is used to add a video, then what is actually added to the content is a thumbnail image of the selected video, not the video itself. This thumbnail image in the content then acts as a clickable link to the video on YouTube. So in the case of a video, whenever the following explanation refers to the widget image, it means this thumbnail image.
The fluid layout behavior of an image/video box widget is defined by a parameter that is configured on the "Fluid Design"
tab of the widget's properties dialog. This parameter defines the width of the image, by setting a percent width
that is combined with the image's original pixel width: The image will either have its original pixel width or the
configured percent width (relative to the width of the containing parent), whichever is smaller.
For example,
an image with a width of 200 pixels and a setting of "33%" will resize itself so that, if possible, it is the full
200 pixels wide (and never larger), but it also never takes up more than 33% of the parent width. Therefore, if
necessary, it automatically shrinks to a size smaller than 200 pixels, if the parent itself is less than 600 pixels
wide.
Summary: The image/video box widget will automatically shrink if the parent width requires it and grow if the width allows it, but will never grow to more than the original image width.
The widget properties dialog allows you to define background colors, paddings and border styles for the widget. Via the properties, you can also add a link target URL to the image, so that the image becomes a clickable link, and enable an image caption that appears below the image.
There are two main variants of the image/video box widget:
-
Without Surrounding Widget Box: The image/video box itself is not surrounded by an additional widget box. The image therefore only takes up as much space as the width definition requires (as explained above). If this leaves unused space to the left or right of the image, then the other content that is outside of the image can flow "around" the image to take up this space.
The image can be defined to be either left or right aligned (in its parent), so the surrounding content then flows around the image on the other side.


-
With Surrounding Widget Box: The image/video box is nested into a surrounding widget box, which always takes up the full width of the parent element. However, the image itself still takes up only as much space as the width definition requires (as explained above). If this leaves unused space to the left and/or right of the image, then this unused space is inside of the surrounding widget box and therefore remains unused, as it cannot be used by the other content that is outside of the widget. Or in other words, the surrounding content cannot flow "around" the widget's image.
The image can be defined to be either left aligned, centered or right aligned in the surrounding widget box, so the unused space (if any) appears either on the right or the left or both.


An image/video box widget can always be switched between these variants via the "Layout" tab in its properties dialog.
Deviating behavior in Outlook: Because of the limited HTML support in Outlook, the behavior of the image/video box widget is different if viewed in Outlook. In Outlook, the image width is fixed. It is always displayed with the original image's pixel width. This width is not dynamically adjusted, no matter the Outlook window size.
Combined Image/Video & Content Box Widget
This widget combines the main properties of the content box and image/video box widgets that were explained above. The widget has an image component similar to the image/video box widget, and it also has a content box component similar to the content box widget that can contain any kind of nested content (including other widgets).
If the widget is used to add a video, then what is actually added to the content is a thumbnail image of the selected video, not the video itself. This thumbnail image in the content then acts as a clickable link to the video on YouTube. So in the case of a video, whenever the following explanation refers to the widget image, it means this thumbnail image.
The widget itself consists of a main widget box that always takes up the full width of the surrounding parent
element. Inside of this widget box, the fluid layout behavior of such a combo widget is defined by a parameter that
is configured on the "Fluid Design" tab of the widget's properties dialog. This parameter defines the width of the
image part, by setting a percent width that is combined with the image's original pixel width: The image will either
have its original pixel width or the configured percent width (relative to the width of the containing parent),
whichever is smaller.
For example, an image with a width of 200 pixels and a setting of "33%" will resize
itself so that, if possible, it is the full 200 pixels wide (and never larger), but it also never takes up more than
33% of the parent width. Therefore, if necessary, it automatically shrinks to a size smaller than 200 pixels, if the
parent itself is less than 600 pixels wide.
The content part in turn will take up the rest of the main widget
box's space that is not used by the image.
Summary: The main widget box will automatically size itself to use the full available parent width. The image part of the widget will automatically shrink if the parent width requires it and grow if the width allows it, but will never grow to more than the original image width. The content part of the widget will arrange itself in the remaining widget space around the image part.
The widget properties dialog allows you to define background colors, paddings and border styles for the widget. Via the properties, you can also add a link target URL to the image, so that the image becomes a clickable link, and enable an image caption that appears below the image part of the widget.
There are two main variants of the combined image & content box widget:
-
Content Flows Around Image: The content that is defined in the content part of the widget flows around the image part, if possible. The image is either placed in the top-left or top-right corner of the surrounding widget box. The other widget content uses the available space beside the image (if any) and also the space below the image, as necessary, including the space directly below the image, thus "flowing" around the image.
The image can be defined to be either left or right aligned, so the surrounding content then flows around the image on the other side.


-
Content Does Not Flow Around Image: The content that is defined in the content part of the widget does not flow around the image part. The image is either placed in the top-left or top-right corner of the surrounding widget box. The other widget content uses the available space beside the image and, if necessary, streches down to use even more space than the image height allows, but never the space directly below the image, thus the content does not flow around the image.
The image can be defined to be either left or right aligned, so the surrounding content is then arranged beside the image on the other side.


A combined image & content box widget can always be switched between these variants via the "Layout" tab in its properties dialog.
Deviating behavior in Outlook: Because of the limited HTML support in Outlook, the behavior of the combined image & content box widget is different if viewed in Outlook. In Outlook, the width of the image part is fixed. It is always displayed with the original image's pixel width. This width is not dynamically adjusted, no matter the Outlook window size.
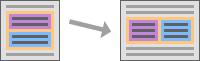
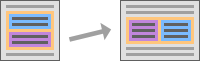
Two Column Layout Widget
This widget has two content boxes that automatically resize and rearrange themselves, either in a side-by-side or top-to-bottom layout, according to the surrounding content and available width. The content boxes can contain any kind of nested content (including for example images, tables or other fluid design widgets).
The widget itself consists of a main widget box that always takes up the full width of the surrounding parent element. Inside of this widget box, the two content boxes are arranged according to the choices on the "Fluid Design" and "Layout" tabs of the widget's properties dialog. By default, the two content boxes are shown in a top-to-bottom layout, with the first content box at the top and the second box after/below the first box at the bottom. But this default layout is only used if necessary. If possible, the two content boxes will automatically rearrange themselves to a side-by-side layout with two columns.
-
The smart side-by-side layout is automatically used in all compliant email clients, if the available window width is at least 640 pixels. Thus, in a large enough window (like on a computer monitor), if the email client supports it, the widget will automatically use the side-by-side layout.
-
The default top-to-bottom layout is used in all email clients if the available window width is less than 640 pixels. Thus, in a small (narrow) window, like for example a smartphone, but also on a large display but with a narrow email client window, the widget will automatically use the top-to-bottom default layout.
-
The top-to-bottom default layout is also always used in all non-compliant email clients, even if the available window width is 640 pixels or more.
In this sense, a compliant email client is an email client that supports the HTML standards that are necessary for the automatic transformation into the side-by-side layout. A non-compliant email client is a client with limited HTML standard support that therefore does not support this automatic transformation.
Summary: The main widget box will automatically size itself to use the full available parent width. The two content boxes will then automatically arrange themselves inside of the widget box, either in a side-by-side layout, if the email client supports it and the available window width is 640 pixels or more, or otherwise in a top-to-bottom layout.
The widget properties dialog allows you to define background colors, paddings and border styles for the widget.
It also gives you the choice over how the two content boxes shall arrange themselves if the side-by-side layout is chosen. Either the top box (in top-to-bottom layout) can become the left column, if the layout transforms to side-by side, or the bottom box can become the left column. In both cases, the other box becomes the right column.
And you can define the column sizing for the side-by-side column layout case: The two columns can be sized with a one-third/two-thirds, fifty/fifty, or two-thirds/one-third width distribution.


A two column layout widget can always be switched between these variants via the "Fluid Design" and "Layout" tabs in its properties dialog.
Deviating behavior in Outlook: Because of the limited HTML support in Outlook, Outlook is a non-compliant email client. Therefore, in Outlook the widget will always use the default top-to-bottom layout and never the smart side-by-side layout, no matter the Outlook window size.
Fluid Design Widget Sample Video
The following video shows how a fluid and responsive HTML newsletter is created from scratch, using LISTSERV Maestro's fluid design widgets:
HTML Support in the LISTSERV Maestro Editor
The HTML editor in LISTSERV Maestro supports only a certain subset of all possible HTML tags, attributes and styles. This subset includes the most commonly used HTML features, especially those that are used in HTML emails.
If you use the editor in Design Mode, then the HTML code that is created will automatically contain only HTML features that are supported by the editor. If the design mode is the only mode you ever use, then this is all you need to know about the editor's HTML support.
But if you are an experienced user with HTML coding knowledge and you sometimes switch the editor into Code Mode to fine tune the HTML or to enter your own code, then the following information may be helpful.
In code mode, the system can of course not stop you from trying to enter HTML code that is not supported by the editor, either by typing it directly into the editor window or via copy & paste from an external source. However, all HTML code that you enter in code mode is checked by the editor at the moment when you submit it, either when you switch back to design mode or when you exit the editor with the [OK] button. If the editor finds unsupported HTML code, then this code will either be stripped or converted into supported code, as described below.
You can disable this HTML code check and thus stop the editor from stripping or converting your HTML code, but only if you are willing to forgo the advantages of the editor's design mode. To do this, first switch into code mode and then enable the code protection feature (via the lock icon in the toolbar). Or alternatively, enable the HTML code protection feature on the "Options" tab of the "Define Message" page before you enter the editor. With code protection enabled, the editor will now accept all HTML code and will no longer strip or convert or otherwise reformat the HTML code that you enter. However, you will also no longer be able to use the WYSIWYG editor because you will not be able to switch back into design mode unless you first disable the code protection.
Further below you can find a table that describes all HTML tags, attributes and styles that are supported by the HTML editor in standard mode, i.e. while code protection is not enabled. All other HTML code is either converted into supported code (if listed below) or is stripped altogether.
Also, when editing the underlying HTML code directly, please keep the following in mind:
- The editor encloses all text in paragraph tags
<p>...</p>
. In design mode, all text that you enter is automatically enclosed in<p>
tags. In code mode, if you enter text without enclosing<p>
tags, then the<p>
tags will automatically be added when you submit the code.
- In design mode, if you press
ENTER
, the editor automatically starts a new paragraph that is surrounded with its own<p>
tags. PressSHIFT+ENTER
if you want to insert a simple<br>
linebreak instead.
- All empty paragraphs are automatically filled with a single non-breaking space, i.e.
<p></p>
automatically becomes<p> </p>
.
- For the text styles "Bold", "Italic", Underline", "Strikethrough", "Superscript" and "Subscript",
the editor uses the HTML tags
<b>
,<i>
,<u>
,<s>
,<sup>
and<sub>
, respectively.
- For the text styles "Font Face", "Font Size", "Text Color" and "Background Color", the
editor uses an enclosing
<span>
tag with the stylesfont-family
,font-size
,color
andbackground-color
, respectively.
- For some tags, the editor supports a freely specified
style
attribute (in the table below shown as "any" style, see for example the<a>
,<img>
and<div>
tags). However, you should specify such styles with care. Not all of the styles that you set in this fashion will be recognized by the editor. This means that even though the specified style remains in the code, the editor may still not be aware of it and may thus behave unexpectedly. For example if you have a<div style="font-weight:bold">
, then all text in this<div>
will appear as bold, but the editor will not be aware of this, so if you place the cursor in the middle of this text, the [B] button in the toolbar will not be highlighted as it normally would be if the cursor is placed inside of text that is bolded with<b>
tags.
- For
<table>
tags, if the "color
" style is not specified, the editor automatically adds "color: inherit
". And if the "font-size
" style is not specified, the editor automatically adds "font-size: inherit
".
- The editor converts the following HTML tags automatically:
-
<em>
tag: converted into<i>
tag -
<font>
tag: converted into<span>
tag, with original "color
", "face
" and "size
" attributes converted tostyle="color:xxx; font-family:xxx; font-size:xxx"
, where the value for "font-size
" is one of the following:x-small, small, medium, large, x-large, xx-large
. -
<span style="font-weight:bold">
tag: converted into<b>
tag. -
<span style="font-style:italic">
tag: converted into<i>
tag. -
<span style="text-decoration:underline">
tag: converted into<u>
tag. -
<span style="text-decoration:line-through">
tag: converted into<s>
tag. -
<strong>
tag: converted into<b>
tag.
-
- The editor converts the following tag attributes automatically into inline styles:
-
<p>
and<h1>
...<h6>
tags: The "align
" attribute is converted intostyle="text-align:xxx"
. -
<img>
and<input type="image">
tags: The "align
" attribute is consolidated with the "float
" style: If a "float
" style is present, its value is written into the "align
" attribute. If no "float
" style is present but the "align
" attribute is, and the attribute has the valueleft
orright
, it is kept and copied into the "float
" style, otherwise the attribute is removed. -
<img>
and<input type="image">
tags: The "border
" attribute is converted intostyle="border-style:solid; border-width:xxx;"
. -
<img>
and<input type="image">
tags: The "height
" attribute is consolidated with the "height
" style: If a "height
" style is present, its value is written into the "height
" attribute (but without the "px" unit). If no "height
" style is present but the "height
" attribute is, then it is copied into the "height
" style (and the "px" unit is added, if applicable). -
<img>
and<input type="image">
tags: The "width
" attribute is consolidated with the "width
" style: If a "width
" style is present, its value is written into the "width
" attribute (but without the "px" unit). If no "width
" style is present but the "width
" attribute is, then it is copied into the "width
" style (and the "px" unit is added, if applicable). -
<img>
and<input type="image">
tags: The "hspace
" attribute is consolidated with the "margin
" style: If present, the attribute is kept and copied into the "margin
" style (formargin-left
andmargin-right
). If no "hspace
" attribute is present but the "margin
" style defines left/right margins with the same value (and not 0), then this value is used to add a "hspace
" attribute. -
<img>
and<input type="image">
tags: The "vspace
" attribute is consolidated with the "margin
" style: If present, the attribute is kept and is copied into the "margin
" style (formargin-top
andmargin-bottom
). If no "vspace
" attribute is present but the "margin
" style defines top/bottom margins with the same value (and not 0), then this value is used to add a "vspace
" attribute. -
<ol>
and<ul>
tags: The "type
" attribute is converted intostyle="list-style-type:xxx"
. -
<table>
tag: The "bgcolor
" and "width
" attributes are converted intostyle="background-color:xxx; width:xxx"
. -
<td>
and<th>
tags: The "align
", "bgcolor
", "height
", "nowrap
", "valign
" and "width
" attributes are converted intostyle="background-color:xxx; height:xxx; text-align:xxx; vertical-align:xxx; white-space:nowrap; width:xxx"
.
-
| Supported Paragraph/Block Tags | ||
p |
Attributes: | dir |
| Styles: | text-align |
|
h1 - h6 |
Attributes: | dir |
| Styles: | text-align |
|
blockquote |
No Attributes/Styles | |
pre |
Attributes: | dir |
| Styles: | text-align |
|
div |
Attributes: | class, id, lang, style, title |
| Styles: | any |
|
| Supported Style Tags | ||
b |
No Attributes/Styles | |
i |
No Attributes/Styles | |
u |
No Attributes/Styles | |
s |
No Attributes/Styles | |
sup |
No Attributes/Styles | |
sub |
No Attributes/Styles | |
span |
Styles: | background-color, color, font-family, font-size |
| Supported Miscellaneous Tags | ||
a |
Attributes: | accesskey, charset, class, dir, href, id, lang, name, rel, style, tabindex, title, type |
| Styles: | any |
|
br |
No Attributes/Styles | |
hr |
No Attributes/Styles | |
img |
Attributes: | align, alt, class, dir, height, hspace, id, lang, src, style, title, vspace, width |
| Styles: | any |
|
| Supported List Tags | ||
ol |
Attributes: | start |
| Styles: | list-style-type |
|
ul |
Styles: | list-style-type |
li |
No Attributes/Styles | |
| Supported Table Tags | ||
table |
Attributes: | align, border, cellpadding, cellspacing, class, dir, id, style, summary |
| Styles: | any |
|
caption |
No Attributes/Styles | |
thead |
No Attributes/Styles | |
tbody |
No Attributes/Styles | |
tr |
No Attributes/Styles | |
th |
Attributes: | background, colspan, rowspan, scope |
| Styles: | background-color, background-repeat, border-color, height, padding, text-align, vertical-align, white-space, width |
|
td |
Attributes: | background, colspan, rowspan |
| Styles: | background-color, background-repeat, border-color, height, padding, text-align, vertical-align, white-space, width |
|
| Supported Page Structure Tags | ||
DOCTYPE |
No Attributes/Styles | |
html |
Attributes: | lang, xml:lang |
head |
No Attributes/Styles | |
meta |
Attributes: | content, name |
title |
No Attributes/Styles | |
style |
Attributes: | type |
body |
Attributes: | dir |
| Styles: | background-attachment, background-color, background-image, color, margin |
|
| Supported Form Tags | ||
form |
Attributes: | action, enctype, id, method, name, target |
input type="checkbox" |
Attributes: | accesskey, checked, disabled, name, tabindex, type, value |
input type="text" |
Attributes: | accesskey, disabled, maxlength, name, size, tabindex, type, value |
input type="button" |
Attributes: | accesskey, disabled, name, tabindex, type, value |
input type="image" |
Attributes: | accesskey, alt, class, dir, disabled, hspace, id, lang, name, src, tabindex, title, type, value, vspace |
| Styles: | any |
|
input type="hidden" |
Attributes: | name, type, value |
textarea |
Attributes: | accesskey, cols, disabled, name, rows, tabindex |
select |
Attributes: | accesskey, disabled, multiple, name, size, tabindex |
option |
Attributes: | selected, value |
| Supported Object Embed Tags | ||
object |
Attributes: | class, classid, codebase, height, hspace, id, style, vspace, width |
| Styles: | any |
|
param |
Attributes: | name, value |
embed |
Attributes: | allowfullscreen, bgcolor, class, height, hspace, pluginspage, quality, src, style, type, vspace, width |
| Styles: | any |
|